- Material
-
- Aluminium 61
- Brass 8
- Stainless Steel 8
- Galvanised Steel 1
- Mild Steel 1
How to Start Creating Metal Art with Simple Techniques
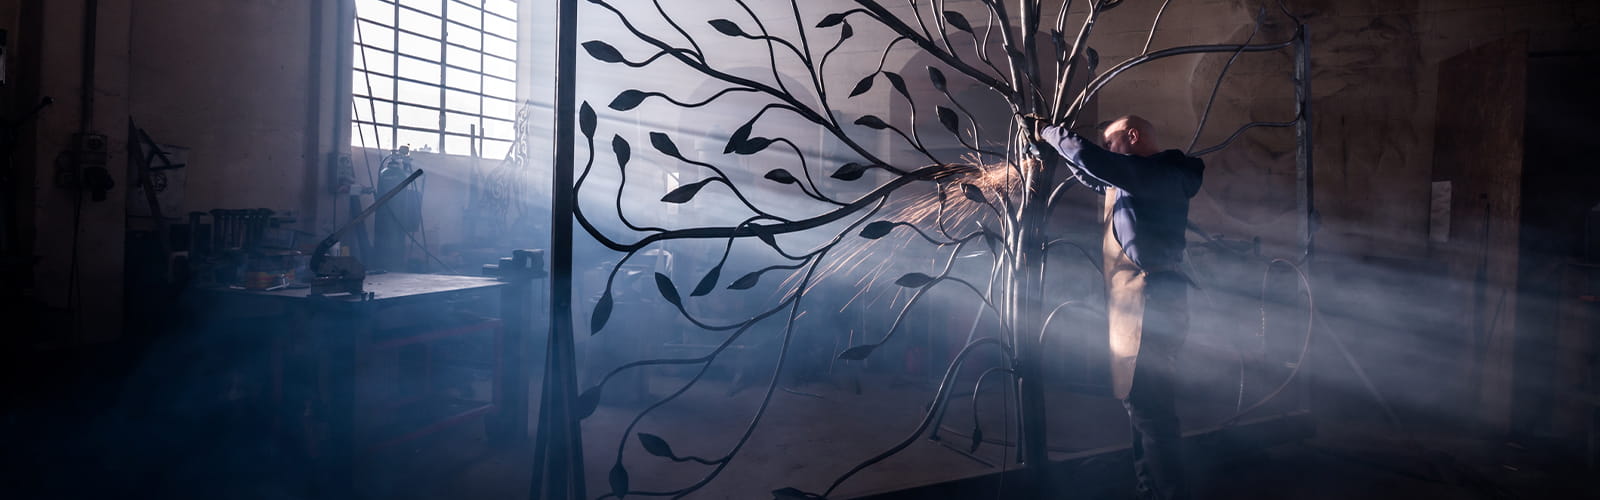
Creating metal art often starts with a simple idea. A small project, a piece of material, and a need to produce something that fits a space or purpose. The challenge is turning that idea into a clean, accurate outcome without unnecessary complexity.
Creating metal art relies on a few core techniques that allow you to shape flat metal into decorative or practical pieces. By learning how to cut, shape, and join materials such as aluminium and stainless steel, beginners can achieve consistent results using straightforward tools.
Many assume metalworking requires specialist equipment. In practice, using flat sheet materials cut to size makes it easier to focus on accuracy and finish from the outset. This reduces waste and supports more reliable results.
This guide explains how to apply these techniques, select suitable materials, and build practical skills that lead to well-finished work.
Turn Raw Metal into Functional & Decorative Designs
Metal art involves shaping, joining, and finishing metal to produce items that serve a purpose or enhance a space. For beginners, this can include wall panels, brackets, or simple fabricated features, as well as more expressive designs. The appeal comes from working with a durable material that can be cut, bent, and formed into defined shapes.
The Victoria and Albert Museum’s (V&A) overview of metalwork highlights how adaptable the craft can be. Examples include ironwork formed into scrolls and patterns, a silver basin shaped from a single sheet to create movement, and a teapot reworked into a vase. These examples show that metalworking techniques can be applied across a wide range of styles and uses [1].
These same processes are used in modern fabrication. From home projects to custom fittings, the ability to shape and assemble metal allows you to produce consistent, practical results using materials such as aluminium sheets and stainless steel sheets.
Master the Core Techniques Used in Creating Metal Art
Most metal art projects follow a structured process, moving from raw material to a finished piece. Understanding how each stage fits together helps you plan more accurately and avoid errors during fabrication.
These techniques form the foundation of both decorative and practical projects.
Cut with Accuracy to Define Clean & Consistent Shapes
Cutting determines the size and outline of your piece, so precision at this stage supports a cleaner finish. Well-cut edges make shaping and joining easier, particularly on visible surfaces.
For most beginner projects, cutting is carried out using:
- Tin snips for thin sheets
- Hacksaws for controlled cuts
- Drills for openings and fixing points
More advanced methods, such as plasma or laser cutting, are used in fabrication for higher precision, but are not required when starting out.
If you need a practical method for creating accurate openings, this guide on a step-by-step guide to drilling holes in metal explains the process.
The Health and Safety Executive (HSE) advises that cutting metal can produce fumes and airborne particles. Materials should be properly secured, and work areas should be well managed to maintain safe conditions [2].
Shape & Form Metal to Build Structure & Detail
Shaping controls how your piece looks and functions. Bending, forming, and hammering allow you to introduce angles, depth, and reinforcement where needed. This is particularly useful for brackets, frames, and edge details that require both strength and alignment.
Simple setups, such as a vice or a bending jig, allow you to produce consistent angles and repeatable shapes. This helps when working on designs that require symmetry across multiple components. If you are working with basic tools, this guide explains how to bend a square bar at home.
Join & Assemble Components for Strength & Stability
Joining determines how your piece performs in use. Welding creates a permanent bond, making it suitable for structural or load-bearing designs. For smaller or decorative projects, mechanical fixings such as bolts or rivets provide flexibility and allow adjustments.
The method you choose should reflect the material, thickness, and purpose of the piece. Planning this stage in advance helps ensure accurate alignment and a stable finished structure.
If you are starting out, this post on the beginner's guide to welding sheet metal explains the process clearly. If welding equipment is unavailable, bonding methods or fasteners can still produce reliable results for smaller projects.
Choosing Materials & Tools for Your First Projects
Starting with the right materials makes projects easier to measure, cut, and shape with consistency. Flat sheets and plates are practical choices because they provide a stable surface for marking out designs and achieving clean finishes.
The UK Government’s 2025 steel strategy highlights the continued importance of steel, with demand estimated at 9 to 11 million tonnes per year. It also notes that offshore wind projects alone may require around 25 million tonnes of steel by 2050. This reflects its ongoing use in construction, fabrication, and custom applications [3].
Material selection should be based on how the finished piece will be used. Lighter metals are suited to decorative panels or wall-mounted features, while more rigid materials are better for structural components or areas exposed to wear. Thickness and finish will also affect durability, particularly in outdoor settings.
Using materials cut to your exact measurements helps reduce preparation time and improve consistency throughout the project.
Tool selection should match both the material and the required level of detail. Using the right tools helps maintain clean edges and precise dimensions, reducing rework and improving the overall finish.
Simple Metal Art Projects to Start With
Starting with smaller projects lets you apply each technique in a controlled way. This makes it easier to refine your approach and produce consistent results before moving on to more complex designs.
Good first projects include:
- Flat wall panels with simple cut shapes
- Geometric designs using straight cuts and bends
- Decorative brackets or small structural pieces
These projects focus on cutting and shaping, helping you improve alignment, edge quality, and overall finish without introducing unnecessary complexity.
If you need inspiration, this guide explores 5 uses for aluminium sheets that can be adapted into creative projects.
Build Skills & Improve Your Results
Consistent results come from following a structured approach and applying each technique with control. Small adjustments at each stage can have a noticeable impact on the final finish.
To improve your results over time:
- Measure and mark materials clearly before cutting
- Work through each stage in sequence
- Keep designs simple before introducing more detail
With over 70 years of experience in the metals industry, Click Metal supplies materials cut to your exact measurements, suitable for renovation, fabrication, and custom projects. This helps you work more efficiently and achieve reliable results.
Call 01794 526090 or enquire online to get the right materials for your next metal art project.
External Sources
[1] The Victoria and Albert Museum’s (V&A), An A–Z of Metalwork: https://www.vam.ac.uk/articles/an-az-of-metalwork
[2] The Health and Safety Executive (HSE), Cutting Metals: https://www.hse.gov.uk/welding/similar-to-welding-fume.htm
[3] GOV.UK, Department for Business & Trade (DBT), The Steel Strategy: The Plan for Steel: https://www.gov.uk/government/consultations/input-into-the-steel-strategy/the-steel-strategy-the-plan-for-steel
Recent Posts


